info@sunlightcn.com

This guide provides a detailed overview of the process for installing self-adhesive switchable film (PDLC film) on existing glass surfaces.
While DIY installation can be used for smaller projects, professional installation is highly recommended for larger or more complex applications.
No.1 Apply pre-cut sheets or pieces
|
1. Prepare the tools and accessories; Non-dust cloth, 99% Alcohol/Clear water, Squeegee, Masking tape, Silicon glass glue, Power Supply/Transformer, Remote control. |
|
2. Clean the glass surface thoroughly; Use 99% alcohol or water to remove all dust, dirt and residue, wipe the entire surface dry with non-dust cloth. |
|
3. Peel off the protective liner from backing and align the film with the glass edges; Fix position with masking tape and make sure the busbar is accessible for the electrical connection. |
|
4. Use the squeegee to remove all air bubbles completely; Start from the center of the film and work outwards. |
|
5. Edge sealing with silicon glass glue; |
|
6. Install the transformer; Install the transformer (driver) in a discreet, accessible location (e.g., within a ceiling void or wall cavity). The transformer converts the standard line voltage (e.g., 110V/220V AC) to the required low voltage (e.g., 48V/65V AC) for the film. |
|
7. Integrate the control system; Connect the transformer to remote control. |
|
8. Test the film; Once the electrical connections are secure, apply power to the film. Verify that the film switches instantly from opaque to clear. Check for any remaining bubbles or electrical faults. |
|
9. Important notes: Install in a clean, dust-free environment; Do not touch the adhesive side with bare hands; Avoid bending or folding the film’s electrode; Do not use sharp objects near the film; Ensure the electrical connections remain dry and protected; If the film is damaged during installation, stop using it immediately and contact our technical support. |
No.2 Apply the entire rolls
|
1. Prepare the tools and accessories; Non-dust cloth, 99% Alcohol/Clear water, Squeegee, Masking tape, Silicon glass glue, Power Supply/Transformer, Remote control, Knife, Measuring tape, Silver paste, Soldering iron, Tin, Copper foil, Electrode line, and so on. |
|
2. Clean the glass surface thoroughly; Use 99% alcohol or water to remove all dust, dirt and residue, wipe the entire surface dry with non-dust cloth. |
|
3. Measure the glass dimensions and cut the film accurately; Confirm the film dimensions against the glass. The film should be cut slightly smaller (1-2mm gap around the edges) than the visible glass area to allow for proper sealing and prevent edge peeling. Mark the intended position of the film's busbar (the conductive strip) for easy wiring access. |
|
4.Connect the busbar and wires; The film's busbar is the point of connection, please find the guide FYI as below. |
|
5. Peel off the protective liner from backing and align the film with the glass edges; Fix position with masking tape and make sure the busbar is accessible for the electrical connection. |
|
6. Use the squeegee to remove all air bubbles completely; Start from the center of the film and work outwards. |
|
7. Edge sealing with silicon glass glue; |
|
8. Install the transformer; Install the transformer (driver) in a discreet, accessible location (e.g., within a ceiling void or wall cavity). The transformer converts the standard line voltage (e.g., 110V/220V AC) to the required low voltage (e.g., 48V/65V AC) for the film. |
|
9. Integrate the control system; Connect the transformer to remote control. |
|
10. Test the film Once the electrical connections are secure, apply power to the film. Verify that the film switches instantly from opaque to clear. Check for any remaining bubbles or electrical faults. |
|
11. Important notes: Install in a clean, dust-free environment; Do not touch the adhesive side with bare hands; Avoid bending or folding the film’s electrode; Do not use sharp objects near the film; Ensure the electrical connections remain dry and protected; If the film is damaged during installation, stop using it immediately and contact our technical support. |
No.3 The guide of connection for busbar and wires
1.Mark the intended position of the film's busbar;
2.Scrape off PE, ITO & PDLC layer with knife from front side of the film, keep next ITO and PET layer on backing, pls see the below photo for your clear:
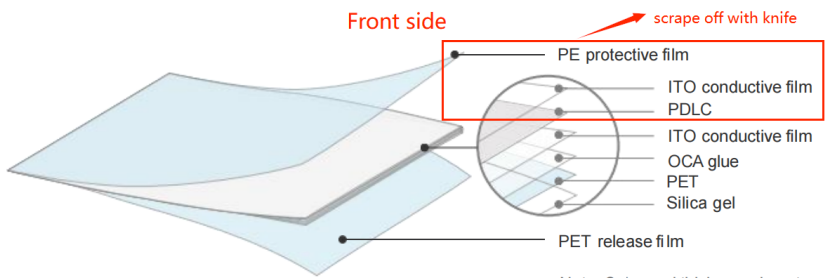
3.Opposite, scrape off PET, ITO & PDLC layer with knife from backing side of the film, keep the first ITO and PE layer on front, pls see the below photo for your clear:

4. Clean PDLC layer with non-dust cloth on ITO till it gets a little transparent, no need fully transparent, just keep a little bit transparent is enough;
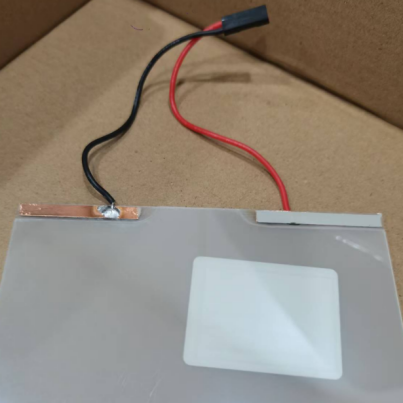
5.Brush silver paste on the exposed area;
6.Make it dry, this silver paste is very easy to get dry;
7.Attach copper foil onto the silver paste;
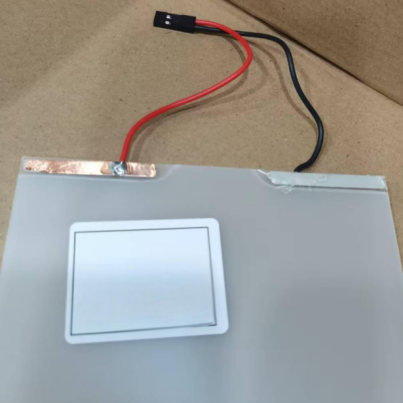
8.Fix the position of busbar, connect the busbar and wires together with soldering iron and tin.
Safety Warning:
All electrical work should be performed by a qualified electrician to ensure safety and compliance with local codes. The correct connection as follows:
Sunlight is a professional manufacturer and direct factory specialized in smart film, smart glass and LED display productions, we look forward to collaborating with you to bring smart and solutions with high-quality products to more markets and projects.....[ our company profile click here ]
![]()
![]()
![]()
![]()
![]()
![]()
![]() Amanda
Amanda
![]() 0086 18649070884
0086 18649070884
![]() info@sunlightcn.com
info@sunlightcn.com
![]() Shenzhen,China
Shenzhen,China
![]() www.sunlightcn.com
www.sunlightcn.com
![]() Mon. - Fri. 10:00-22:00
Mon. - Fri. 10:00-22:00
